 CaptionAgent
HELP
CaptionAgent Step by Step
From your first recording to a finished clip with captions: here you’ll find every feature explained in detail – with pictures from the app, practical tips and solutions for when something goes wrong.
Topics
 Quick Start
 Recording Well
 Teleprompter
 Interviews & USB Microphones
 Checking the Text
 Cutting
 Caption Style
 Scenes & Cutout
 Enhance Audio
 Export & Share
 Basic Version & Pro
 Privacy
 Feedback & Requests
Quick Start
Go from video to finished clip with captions in three steps. Everything runs right on your device – no account and no upload.
Step by step
- On the home screen, tap “Record” to record a video or audio directly in the app, or “Import” to open a video from Photos or Files.
- CaptionAgent creates the captions automatically. The first time, Apple downloads the language pack for your language once.
- Check the text, choose a style and tap “Export”. Your clip is done – as a video with captions in the picture or as a subtitle file.
Tips
- With “View Example” you can try out all the tools on a short sample video, without any footage of your own.
- Several files at once? They’re processed one after another, and you can keep working in the meantime.
- In the ⋯ menu at the top right you’ll find Help, “How it works”, Feedback and Settings.
If something doesn’t work
The captions don’t start.
Check that the language in the video is set correctly and that there’s enough free storage for the language pack. The language pack needs an internet connection the first time.
Example use · AI demo person
Recording Well
Good sound matters more than a perfect picture – it also makes the captions more accurate. A few simple steps make every recording noticeably better.
Step by step
- Tap “Record” and choose “Video”, “Audio” or “Interview”.
- Turn on the camera and microphone. The frame in the preview shows where the captions and the social media controls will appear later – keep that area clear.
- Watch the level meter while you speak and start recording, with a 3-second countdown if you like.
Tips
- Light: Face a window or a lamp. Light from behind makes your face look dark.
- Sound: Record in a quiet room. Rugs, curtains and furniture reduce echo. A clip-on microphone helps a lot.
- Distance: about an arm’s length, with your eyes in the upper third. For Reels, hold the iPhone upright.
- With “Mirror” you see yourself in the preview as in a mirror; the finished video stays the right way round.
If something doesn’t work
The level meter doesn’t move.
Then no sound is coming in. Check that the right microphone is connected, and allow CaptionAgent to access the microphone in Settings.
Example use · AI demo person
Teleprompter
Read your script straight from the screen while you record. The prompter follows your voice: word by word with on-device speech recognition, and in every other language at the pace of your voice.
Step by step
- Open video recording and tap the text icon at the top right.
- Write your script, import a text file or tap “Sample text” to try out the feature.
- Choose the language you’ll speak and turn on “Use prompter”. Back in the camera, the text scrolls along as you speak.
Tips
- The prompter only appears in the preview, never in the recorded video.
- You change size and position directly on the prompter; drag it close to the camera so your gaze looks natural.
- Tap a line to jump there. Pause stops the text from moving on.
- Under “Follow”, choose “Word follow” (speech recognition, word by word) or “Voice-paced”: the text then moves at the set pace while you speak and holds in pauses. Two sliders set the pace and the sensitivity.
If something doesn’t work
Message: “This language has no on-device speech recognition. The script now moves at the set pace while you speak.”
There’s no local dictation model for this language on your device, so the prompter switches to “Voice-paced” by itself and keeps going. If you want word follow, add the keyboard for this language in Settings under General → Keyboard and turn on dictation.
Voice-paced: the text moves in silence or stops while I speak.
Stay quiet for a moment at the start of the recording so the prompter can measure the room’s background noise. If the text moves in pauses, lower the sensitivity; if it stops while you speak, raise it. Use the pace slider to match your speaking speed.
The text jumps or gets stuck.
Speak clearly and stay close to the script. If what you say differs a lot from the text, the prompter briefly searches for the right spot. Tap the line to reposition it.
Example use · AI demo person
Interviews & USB MicrophonesiPhone and iPad only
Two cameras, two people and, if needed, two separate microphone channels. CaptionAgent automatically cuts to whoever is speaking.
Step by step
- On a supported iPhone or iPad: Record → Interview. Hold the device between the two of you: rear camera toward the guest, front camera toward you.
- Use the zoom levels to frame the guest and start recording. Both cameras record at the same time.
- After recording, CaptionAgent creates an automatic edit based on lip movement and sound. In the Cut section, you can correct any camera switch with a tap.
- Under Style, you can give each person their own caption color or even a completely separate style.
Tips
- Connect a USB receiver before opening interview recording and set it to stereo or separate L/R output. Default: Guest = left, You = right; use the double arrows to swap the assignment.
- Test the microphones one at a time before you start: only the matching level should rise clearly.
- When cutting, the sound follows the visible camera – even after manual changes and when exporting.
If something doesn’t work
Both levels move the same way.
The receiver is outputting a mix. Set it to separate channels (stereo, L/R). If the input is mono or has changed, the app shows a notice; reopen the recording after connecting.
The automatic edit switches too early or too late.
In the Cut section, tap the right spot and choose “Other camera from here”. “Undo” reverses any change.
Example use · AI demo person
Checking the Text
Speech recognition is good, but not flawless. A quick look over the text is worth it – especially for names and technical terms.
Step by step
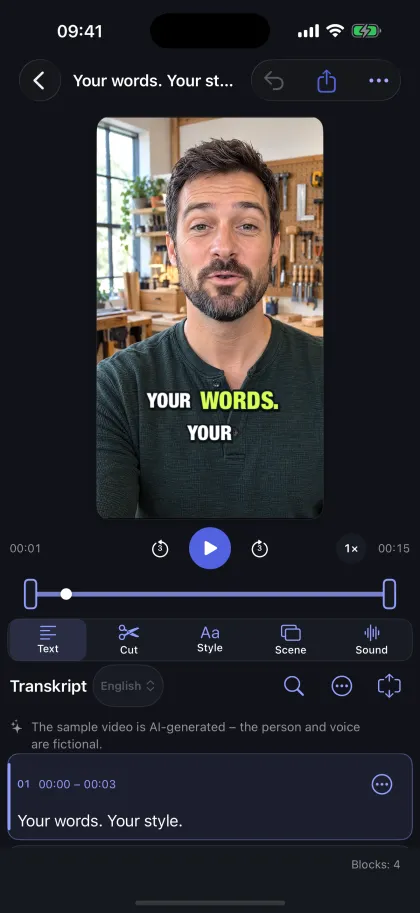
- Open a project. Below the video, you’ll see the transcript in blocks.
- Tap into a block to correct the text. The captions update immediately.
- Uncertain spots are highlighted. “Next Uncertain Spot” jumps straight there – on the Mac with ⌘G.
Tips
- Select a block’s time to jump to that spot and listen to it.
- With “Emphasize Word” you can highlight individual words in the caption.
- Use search to quickly find names and technical terms and replace them everywhere.
If something doesn’t work
The wrong language was detected.
Choose “Language in Video” and then “Recreate Captions…”. Your cuts are kept.
Example use · AI demo person
Cutting
Trim the start and end, or remove individual words, pauses and filler words – right in the text. Your original always stays unchanged.
Step by step
- In the editor, open the “Cut” tool.
- Drag the handles on the filmstrip to set the start and end.
- Remove individual words or whole blocks with a tap. Video, sound and captions are shortened together.
Tips
- “Find filler words” marks “uh”, “um” and the like; “Shorten pauses” tightens long pauses. You decide what goes.
- On devices with Apple Intelligence, “AI suggestions” propose further cuts.
- Every cut can be reversed – with “Undo” or in the ⋯ menu of the Cut section with “Reset all cuts”.
If something doesn’t work
A cut sounds choppy.
Place the cut one word earlier or later. Very short leftovers between two cuts often feel jumpy.
Caption Style
The style determines the font, colors, background and animation of your captions. More than 60 designs are ready to use – and each one can be customized.
Step by step
- In the editor, open “Style” and choose a design from the catalog. The preview shows it right away with your text.
- Adjust size, position, colors, outline and background. You can also move the captions directly in the preview image.
- If you especially like a style, save it under “My styles” or set it as the default for new projects.
Tips
- With brand colors, you use your brand’s colors for captions and scenes.
- For interviews, choose “Guest” or “You” at the top: the default is a style with its own color for each person, and if you like, each person can get a completely separate design.
- Turn off motion if you want the captions to look calmer.
If something doesn’t work
The caption is smaller than I set it.
Very long words or many lines don’t fit into the chosen width. CaptionAgent then reduces the font size instead of breaking words. Widen the caption box or show fewer words per page.
Scenes & Cutout
Scenes place you in front of a designed background: full screen, split screen or picture-in-picture – ideal for vertical clips.
Step by step
- In the editor, open “Scene” and choose a template and the aspect ratio, for example vertical 9:16.
- Under Cutout, choose “Cut out person” or – in front of a green or blue wall – “Remove green background” or “Remove blue background”.
- Add a headline if you like, check the preview and tap “Apply”.
Tips
- With a green screen, even curls and fine hair are cut out cleanly; without a backdrop the edge is good, but the finest flyaway hairs may be lost.
- “More precise cutout” steadies the edge in calm shots, but the export then takes considerably longer.
- Effects like shadows or a cardboard cutout give the cut-out person more depth.
If something doesn’t work
The person couldn’t be cut out.
Choose a different preview moment in which the person is clearly visible, or use the scene without a cutout.
The preview stutters.
Cutting out takes processing power. On older devices the preview may stutter; the export isn’t affected, but it takes longer.
Example use · AI demo person
Enhance Audio
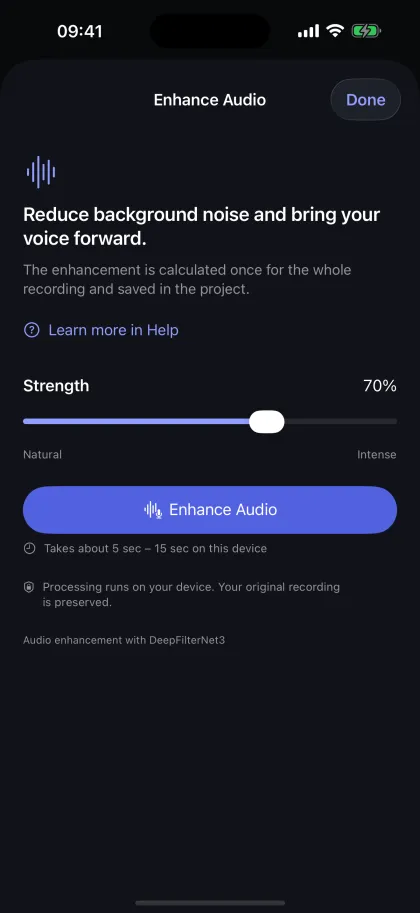
“Enhance Audio” reduces noise and echo in the original sound – right on your device.
Step by step
- In the editor, open the “Sound” tool.
- Set the strength and start processing.
- Compare “Original” and “Enhanced”. The version you choose is used for the preview and the export.
Tips
- Set too strong, a voice quickly sounds artificial. A medium strength is often enough.
- With long videos, processing takes a while; you can cancel it at any time.
Export & Share
Export your video with captions in the picture, or just the captions as a file for YouTube and editing software.
Step by step
- In the editor, tap “Export” and choose “Video with captions” or “Subtitle file”.
- Choose the quality and frame rate. Full HD is enough for Reels and Shorts.
- After exporting, save the video to Photos, as a file, or share it directly.
Tips
- 4K is only worth it if your original was recorded in 4K.
- You can use SRT and VTT files on YouTube, for example, or in Final Cut and DaVinci Resolve.
- From the ⋯ menu on the home screen, you can export subtitle files from several projects at once (Pro).
If something doesn’t work
The export stops.
Keep the app in the foreground during the export and make sure there’s enough free storage. Long videos with a cutout take especially long.
Basic Version & Pro
The basic version is free and includes all features for trying them out. Exports there are limited to 10 seconds. Pro removes this limit.
Step by step
- Open the ⋯ menu on the home screen and tap “Unlock CaptionAgent Pro” – or, in Settings, tap “Free Basic Version”.
- Choose an annual subscription, a monthly subscription or the one-time purchase without a subscription.
- Confirm the purchase with your Apple Account. Pro applies immediately on all your devices signed in with the same Apple Account.
Tips
- Pro offers exports with no length limit, 4K Ultra HD and batch export of subtitle files.
- New device or reinstalled the app? In Settings, tap “Restore Purchases”.
- You manage and cancel subscriptions in your device’s Settings under your name → Subscriptions.
If something doesn’t work
Pro isn’t active after purchase.
Tap “Restore Purchases” and check that you’re signed in with the same Apple Account.
Privacy
CaptionAgent processes your videos on your device. There’s no account, no advertising and no tracking of how you use the app.
Tips
- Captions, cutting, cutouts, audio enhancement and export all run locally on your iPhone, iPad or Mac.
- Apple may download required language models. Purchases go through the App Store; we never receive payment details.
- When you delete a project, your original file is kept. Videos recorded directly in the app are deleted along with it.
Feedback & Requests
Missing a feature, or something isn’t working? Let us know – many improvements come from exactly this kind of input.
Step by step
- Open the ⋯ menu on the home screen and tap “Feedback & Requests” – or find it in Settings under “About CaptionAgent”.
- Choose the type (feature request, problem, praise, other) and enter a short title and a description.
- Tap “Send by email” or share the feedback via another app.
Tips
- App and system information is only added if you want it. It never includes your videos or texts.
- The app itself doesn’t send anything: your mail app sends the message.
Frequently Asked Questions
Do I need an internet connection?
Only once, so Apple can download the language pack for your language, and for purchases. After that, CaptionAgent works offline.
Which languages does CaptionAgent recognize?
The captions use Apple’s on-device speech recognition, including German, English, French, Spanish, Italian, Portuguese, Japanese, Korean and Chinese. You can see which languages are available in the “Language in Video” picker.
Are my videos uploaded?
No. Everything runs on your device. An upload only happens if you share something yourself or save it to cloud storage.
Where can I find my projects on another device?
Projects stay on the device where you created them. You can pass on the exported video via Photos, iCloud Drive or AirDrop.
Can I still change the captions later?
Yes, at any time. Text, style, cuts and scene remain editable until you delete the project.
Why is the export limited to 10 seconds?
That’s the free basic version for trying things out. With Pro, you can export videos of any length.
Does CaptionAgent work on the Mac?
Yes. On the Mac, you edit imported and recorded videos with the same tools. Simultaneous interview recording with two cameras is intended for supported iPhones and iPads.
How do I cancel a subscription?
In your device’s Settings under your name → Subscriptions. The one-time purchase isn’t a subscription and doesn’t expire.
Still have questions?
Write to us via “Feedback & Requests” in the app or by email. We read every message.